Don’t die of boredom!
- Victoria Palmer
- Mar 18, 2020
- 4 min read
Well, as we face weeks of social distancing and self isolation, I thought now would be a good time to create some little sewing tutorials. What better way to while away the hours than a sewing project?
First up...
How to make bias binding
You can buy ready made bias binding but colours are limited and it’s not always the best quality. The advantage of making your own is you can choose your fabric to match your project and it can be a great way to use leftover fabric. The disadvantage is the amount of fabric it can take, more on that later.
The reason it’s called bias binding, is that it’s cut on the bias of the fabric (also known as ‘the cross’). Put simply, the bias is the 45 degree angle from the straight grain of your fabric. To find the bias, first identify the straight grain. If you still have the selvedge on your fabric, this is the straight grain. It is the plain edge, often with writing on it, that doesn’t fray.

If you no longer have the selvedge, try to find the straight grain by following the pattern, like the stripes in my picture or by looking closely at the woven threads.
Now fold the fabric to create a right angle with the straight grain. You can use a set square to help you here but a sheet of A4 paper would work just as well. The fold will be on the 45 degree angle.

You can now cut along the fold, this gives you the first edge to cut your strips of bias to make your binding from. Mark lines 4 cm apart following this cut edge until you have enough to complete your project.
If you have bought fabric specifically to make your binding or if you have lots of fabric at your disposal, you can cut a strip the full width of your fabric. This can be very uneconomical but saves a lot of joining. If however, you are making your binding from leftovers, cut as many shorter strips as you will need to complete your project once they are all joined together.

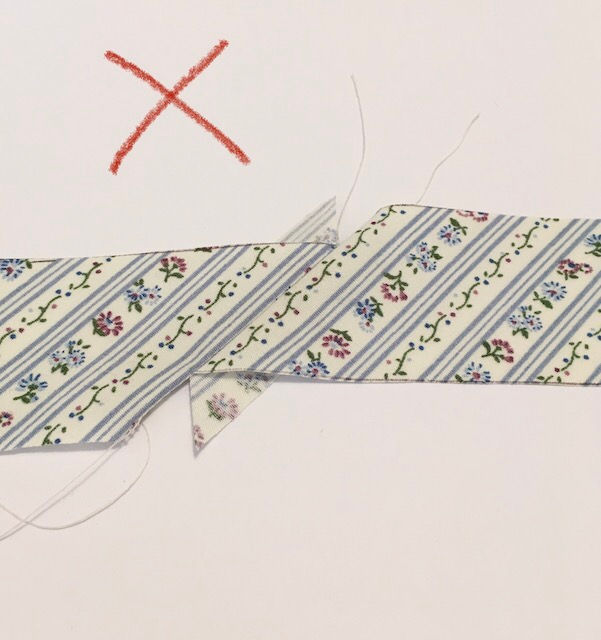
To join your strips you will need to lay them RIGHT SIDE UP on your work table end to end, as they will look when joined. You may have to to cut the end of some strips to allow them to be joined according to the pattern.

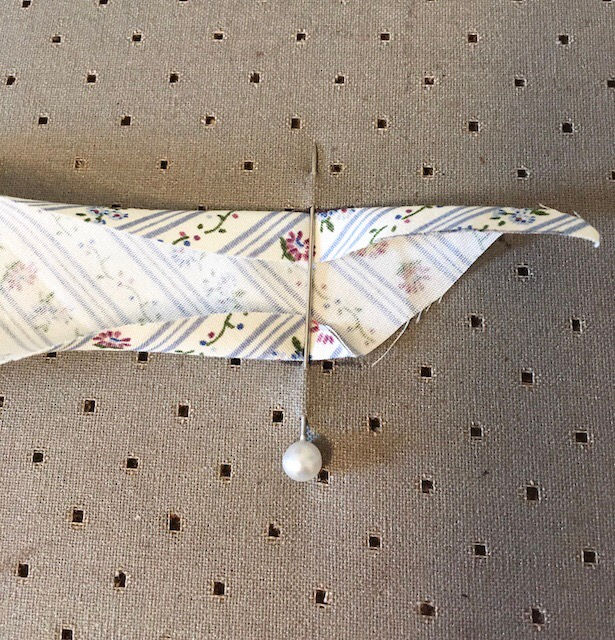
Then take the strip on your right and fold it over the other strip so that RIGHT SIDES are facing and the raw edges are even. Your two strips should form a right angle, if they are lying one on top of the other, try again until you have a right angle like in my next picture. Try to match any patterns or stripes here so the join is as invisible as possible.

Using a small stitch on your machine, sew the strips together parallel to the cut edge so you are joining them on the straight grain. This will avoid a wobbly seam.

You can see from the picture there are two triangles of fabric overhanging at each edge. This is because your line of stitching needs to be where the two strips intersect in order to create a continuous strip.

If you match the raw edges incorrectly it will create a stepped effect to your binding and it will be impossible to use.

Once you have joined all your strips together into one long, continuous piece you can make it into bias binding.
The easiest way to do this is with a little tool specifically made for the job. They are inexpensive and come in different sizes for different widths of binding. The one I use most frequently is to make binding 2.5cm wide.
Insert the end of your bias strip into the bias binding maker, WRONG SIDE UP. Using the metal loop, gently pull the maker to your left while you keep your iron close to the front edge of the maker. (Or the other way round if you are left handed and use your left hand to iron!) It will press the two raw edges over towards the centre while you guide the fabric through. Be sure to keep the fabric feeding in evenly so the same amount of fabric is turned in on each side.

If you don’ t have a bias binding maker, there is a little trick you can use on your ironing board. Mark two lines on the surface of your board 2.5 cm apart and insert a long pin through the marks.

Push the end of your bias strip under the pin, folding the edges in as you go. Smooth with your fingers and gently pull the fabric under the pin. Be sure to keep the fabric feeding in evenly so the same amount of fabric is turned in on each side.
Use your iron to press the binding as you pull it through

Your binding is ready to use! Depending on what you intend to bind, you may need to fold the binding in half and press it. If you are binding the edge of a quilt for instance
or using the binding to finish a hem or edge, you will fold it in half. If you are using it to finish an armhole where the binding is turned completely to the wrong side, you will use it flat.

Happy binding! Next up will be how to use your binding and also a little tutorial on how to read and interpret a dress pattern envelope. Then there will be no excuse not to use some of the fabric in your stash to make some new clothes!


Brilliant Vicky ... will endeavour to keep checking in and do some projects . X
Rapid scroll through & I can see it’s fabulous, will look more closely tomorrow-well done clever lady xx
Lovely tutorial. Thanks so much for sharing x
Thanks Karen, it’s good to stay in touch during these unsettling times. So sorry it’s had such an immediate effect on businesses like yours, keep safe and well. X
Fantastic Vicky! Great initiative. Well done! I will certainly keep checking this for projects. Xx